Showing posts with label Cricut. Show all posts

Friday, December 27, 2013

Family Birthday Tracker

Hello friends. Hope everyone had a very merry Christmas.  I enjoyed every minute of our celebrations with our families.  We are so blessed. : )

I did my first real Pinterest project.  My mom saw this birthday tracker on pinterest and told me that was what she wanted for Christmas.  So I did my best to create one for her.  I think it turned out pretty good.


I bought the base from Michael's.  I added the hooks to the bottom. They were gold which I didn't care for but I decided I could spray paint them along with the base.  I used Krylon dual Paint + Primer and it worked beautifully.   I cut the letters for "Family Birthdays" using my Cricut and DCWV paper.  I wish I had centered it better but I'd already mod podged them and couldn't move them. Poor planning on my part.
The letters for the months of the year, I just stamped on the wood.  It didn't come out quite dark enough so I went over them with a Sharpie.  I also used the sharpie around the edge of the frame.  The tags are  circle tags you can get at an office supply store. I think there were 50 in the package. I gave my mom all the extras so she could add anyone else to the bithdays that I might have missed. 
I hot glued a flower to the center just to add a little interest.

Not bad for my first attempt. ;-)

I received some super scrapbooking products for Christmas.  Hopefully I'll have some nice things to post for you coming up in 2014.  

Thanks for taking a look.

God bless.

-Chris


Sunday, October 20, 2013

Name Frame and Card

Wowsers...I've been gone a long time.  I've been super swamped with family life.  We are homeschooling our kids this year ( a first for us) and it's been a challenging start.  I'm happy to say that I think we've found a routine that's working and we are loving that the kids are at home.   The stress of getting things going and some other things left me with no creative mojo.  But I just won 14 totally awesome cats eye inks from Clearsnap from their World Card Making Day contest and I feel inspired to create again!  Yay for me.  Thanks Clearsnap!

So my project for today's post is a name frame that I made as a gift.  A couple from our small group at church just had a baby girl and I wanted her to have something personal and you can't get more personal than your name, right? So here it is:


I used my Cricut to cut the letters, the shaped layer and the butterfly.  I inked all the edges using my new Clearsnap inks!  It's hard to tell from the picture but I also stamped a flower pattern on the cream shaped layer using curry colored Clearsnap ink.   The frame was originally black but I spray painted it using Krylon ColorMaster paint in a watermelon color.   I'm so happy with how it turned out. I super glued the flowers on the outside and added some pretty gems to the inside to finish it off.


Here's the card I made to go along with the gift.   All the patterened papers are by s.e.i..  The shapes are cut from the Cricut and the hearts were embossed using the Texture Boutique.  Again I used my new Clearsnap inks for the edges and the sentiment.  I used Curry, Berrylicious & Arctic Deep inks.


Thanks for stopping by and having a look.
Hope you're having a wonderful craft-filled day. 

God Bless.

-Chris


Wednesday, April 4, 2012

Love Birds - 1962

Today's post is a layout for my parent's 50th anniversary scrapbook. I won the In Love Collection from Webster's Pages.  It is such a gorgeous collection and I'm actually having a hard time using it because I want to hoard it!  Shame on me. I know.   If you check out their website you can see all the incredible products they have and tons of beautiful sample pages on how to use them.   I really love the layered, heavily embellished pages that they showcase but I'm not so good at making those kinds of pages.  I guess I'm more of a clean and simple gal!  (probably because I'm hoarding the supplies!!!)  So anyway, on to my layout:


(you can click on the pictures to see them larger)


a little closer view of some of the embellishements


I love all the beautiful embellishments that Webster's Pages provides. 
The cameo, the resin heart, the rhinestone button, the heart ribbon trim, & the Love Birds journaling card are all part of the In Love Collection.
I cut out the words "Cherish" & "Forever" from the patterned paper.
I also fussy cut the flower part from the paper and used foam tape to give it some dimension.
The butterflies are stamps that I stamped and cut out. I added some Stickles to them and a pearl dot.


 Here's another layout I've made using Webster's Pages In Love Collection.

I cut the bird cage out of the In Love papers using the Best Images of 2009 Cricut Cartridge. 
The other layered border shapes were cut using Elegant Edges Cricut Cartridge.
I used the beautiful fabric tag, princess petal, & flower cameo embellishements.
The word "family" is alpha stickers from the In Love Collection too.

Not hard to make a pretty layout with their incredible products. : )

Thanks for taking a look. 
Have a blessed day. 


Wednesday, March 7, 2012

You are Classic - birthday card

My Father-in-law's birthday is this weekend.  He's so hard to buy for because he already has everything. But at least I know he won't be getting another card just like this one.  lol. : )

Here's what I made:


I cut the car and the word "classic" from the Nifty Fifties Cricut Cartridge.
The hearts I cut by hand. (I needed to add something pink to meet a challenge criteria)
The stamp sentiments are from My Creative Time.
The ribbon is from my stash.
All the papers are DCWV except for the striped background paper. That's Echo Park.


I'm entering this in a couple of challenges:

(I don't own an imagine, so I used patterned paper)
(You had to use Teal, Red & Pink)

(anything goes)

Thanks so much for stopping by.  Hope you'll come back soon.

Your comments are blessing.


Tuesday, February 28, 2012

Monogram Frame

Over on the Bitten by the Bug 2 blog, the challenge is:  

Any Cartridge Monogram Challenge


Here's what I made


I plan on hanging this in my youngest daughter's room which is done in Winnie the Pooh.

I used the Disney Pooh Font Set cartridge.
I cut the jars at 4.50.
I cut the shadow for the jars at 4.75.
I cut Pooh, Piglet & Tigger at 2.50.
The bows that I added to the top of the jars are from the Best Images of 2010 cartridge.
I added a rhinestone gem to the middle. 
The background paper is from DCWV Lemon Flower Stack. 

I hope you'll head over the BBTB2 blog and check out all the design team samples and everyone's entries. Lots of amazing ideas there. 

Thanks for taking the time to look.  Hope you'll leave a comment and let me know what you think.
Have a wonderful week. 

Thursday, February 23, 2012

Birthday Things to Do - My Creative Time

I made this birthday card for my brother-in-law.  I saw there was a "linky" party over on the My Creative Time's blog.  You need to use a stamp from one of Emma's 1st, 2nd, or 3rd Edition sets.  You can check out all the details HERE.  I was blessed to win 10 of her stamp sets through the Everyday Cricut blog and I'm just loving all the great sentiments.  Thankfully one of the sets was from her 2nd Edition.  That would be the "Turn that Frown Upside Down" set.


The sentiments "Don't worry by happy" & "smile..." are from the 2nd Edition set. 


I actually used 5 My Creative Time stamp sets in all:
Turn that Frown Upside Down
Many Greetings
My Favorite Sayings
Camera Shy
Honey Do List

It's hard to tell from the picture but on the clip board, I stamped the clip part a second time and cut it out and popped it up with foam dots. 
The paper is DCWV Tattered Time.
The "gear" circles are cut from Cricut's Elegant Edges Cartridge.
The ribbon is from my stash.
I put a little "star" gem on the flash of the camera. 

Thanks for taking the time to check out my card. I hope you'll take a moment to leave a comment.
(word verification is off.)

Wednesday, February 22, 2012

Best Wishes & Congratulations

I made two cards because I was inspired by this card:


made by Kim at Joyful Creations with Kim

I just absolutely love everything about her card.

Here's my interpretation:


The shimmer paper was probably the wrong choice for picture taking purposes.
It sure looks pretty in person. : )

I used the cricut craft room to line up my images in the grouping that I wanted.
I used the Best Images of 2010 cartridge.
Then just cut them out on the the paper I wanted to use.
Then I picked my background paper and adhered it.
Added my sentiments and a teeny bit of embellishment and all done!
The sentiments are from a Fiskars Stamp set.


I think I'll be making more of these in the near future. 
Thanks so much Kim for the inspiration.


Happy Birthday Brooch Card

Today's card is one I made for a friend's mom who is turning 90 years old in March.  I was inspired by the Fantabulous Cricut Challenge Me Monday #99 challenge.  It's to use fabric, lace or other trims in your project.

Here's what I came up with:


I used the Cricut Craft Room to weld my Elegant Edges image together to make the card base.
Then I cut the top layer a little smaller.  
I added some pretty yellow ribbon from my stash to bring out the yellow of the brooch. 
I had that pretty lace doily forever and finally broke down and used it.
I really wanted to hoard it... shame on me!
The brooch is something my mom picked up at a garage sale for me to use in my crafting.
I love taking old items and repurposing them.
I just removed the pin from the back and glue dotted the brooch to the card. 
The happy birthday sentiment is a rub-on. 
My papers are all DCWV
I added some liquid pearls to the corners and that's it. 

Thanks for taking a look.  I hope you'll take some time to leave a comment.
(I turned off that crazy word verification part!)

Have a blessed week. 


Thursday, February 16, 2012

U R Sew Fun

I'm entering the following card in two challenges:

1) Challenge Me Monday #98 over at Fantabulous Cricut Challenge blog
      Fun with Puns challenge

2) Cricut Cardz Challenge 102 over at the Cardz TV blog.
     A Stitch in Time  - make a project using real or faux stitching, any occasion, any cartridge, any color

Here's my card:


Close up


 Inside


My double "stitches" are done using the We R Sew Stamper tool.  (I'll be honest, I'm not having the best of luck with this tool.  I bet other people do great with it. I probably just am not using it right.)

I used the Nifty Fifties Cricut cartridge for the Sewing Machine,Dress, Dress Form and for the "UR Sew Fun" letters. 
Most of the papers I used are from my scraps. The background paper is DCWV. 
Ribbon is from my stash. 
I used Martha Stewart Lilac ink to ink the edges. 
I used my Marvy corner punch to round two of the edges. 
The "You are the Best" stamped sentiment is form My Creative Time's "My favorite sayings" set.
I used sandpaper to rough up the gray layers. 

I think that covers everything.

Thanks so much for looking.  Don't forget to leave me a comment. I love hearing your thoughts on the project. 


Wednesday, February 15, 2012

Couples Heart Challenge

Today's post is for the Bitten By the Bug 2's Couples Heart Challenge.  I don't own the Cricut Love Struck 2010 cartridge that the challenge is based on but I do have the Spring Fever Holiday cartridge and it has a Couple Heart for me to use.

I decided to make mine a wedding or anniversary card. 


The sentiment says "Congratulations to the perfect couple"  It's from My Creative Time's "many greetings" stamp set.  I added some pearl flourishes and inked the edges of the card and ta-da!  : )  My papers are from DCWV.  The shiny gold of the couple looks so much nicer in person. It didn't photograph well. 

Thanks for taking the time to look. Every comment is a blessing so don't forget to leave one. ; )

Saturday, February 11, 2012

My Pink Stamper Blog Hop Challenge Feb 2012

Robyn over at My Pink Stamper has issued a challenge as part of her blog hop.  The challenge is to make a project with the following criteria:


Use the color red, a circle, a pink ribbon and MORE THAN ONE  My Pink Stamper stamp. (If you don't own any of my stamp sets yet, that is okay!  Use what you have).  
Also, use a die cut with this challenge!  Anything will work!

so... I don't own any of Robyn's wonderful stamps yet.  I sure would love to win some!  So here's my chance with this challenge. She's giving away 6 of her stamps sets, winners choice! *Squeal* My card is for my littlest girl for Valentine's day


The stamps I used are from My Creative time. "You're so sweet" is from the "This & That" set.
"I love you with all my heart..." is from the "My Favorite Sayings" set.

I have my pink ribbon,  the color red, the circle and a die cut.  I cut my ladybug from the Create-a-Critter Cricut cartridge. 

I drew the white hearts in with a gel pen and added the grass (using my fiskars punch) to pull a little of the green out of the patterned paper. 

Thanks for looking.  Hope you'll play along and submit an entry. 

Thursday, February 9, 2012

DCWV February's Stack-a-holic Template Challenge

So HERE'S the challenge for February from DCWV.  Make a layout using DCWV papers using this sketch from Sketch Savvy.


And here's my version of the sketch.


The majority of layout is using the Tattered Time Stack (which I won --- Thank you Erin!)
The gears are from one of the papers from the Tattered Time Stack. - I just cut them out and used them for my circles.  I added some colored pearls to the centers to brighten them up a bit. 
The "May 1962" letters are also one of the papers from Tattered Time which I cut out and used as my banners. 
The light aqua paper is from the Textured Cardstock Stack-Brights. 
The brown shimmer paper is from the Holiday Shimmer stack. 
The Flowers are from The Craft's Meow grab box I recently bought. 
The "Jim & Andrea" were cut out using my Nifty Fifties Cricut cartridge. 

My parents will be celebrating their 50th wedding anniversary this May. That's a whole lot of love!  I'm making them a scrapbook in celebration of this awesome event!

Thanks for stopping by.  I hope you'll take some time to leave me a comment and let me know what you think. 

Monday, February 6, 2012

School Valentine's

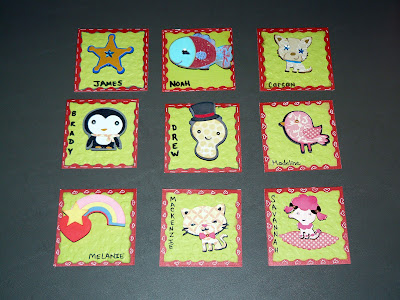
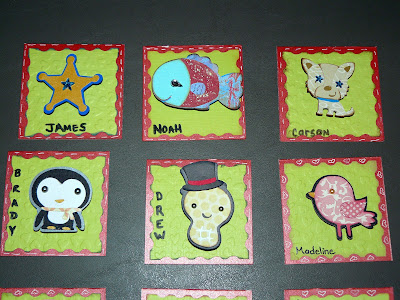
I wanted to make Valentine Cards for my son to give to his classmates. I had him look at the Create-a-Critter cartridge book and he picked out a different image for each of his classmates.  I got the idea for making the 3x3 card from Jeri at Bug 'n Me Creations and she also gave a list of really cute sentiments to use along with the Critters.  I made up a few of my own too.  It was a fun project.
Anyway, here's a look at the cards:


 A little closer look.... I'm wishing I hadn't written their names on the front but what's done is done.


 The Peanut Guy is my son's favorite. He thinks it "hilarious!"

So the Sheriff's badge sentiment I came up with is: You're definitely one of the good guys.
The Peanut Guy's sentiment I came up with is: I'd have to be nutty not to wish you a happy Valentine's Day.
The Rainbow sentiment I came up with is: May your Valentine's Day be as wonderful as all the colors of the rainbow. 

To make these cards a little EXTRA FUN.... I made each of the characters a magnet!  So the kids can take them off the card and put them on their fridge or something. : ) 


Since I it was an after thought I didn't "hide" the metal washer. If I had planned it out, I would have put the washer underneath the green layer. : )


I added a magnet to to the back of the Critter


and ta-da!!!  It's attached and super fun for the kids.

The card for his teacher has 3 magnets.  She collects monkeys.  So we made her this:


 As you can see from the above picture, I had lined them up all the same.  But since they are magnets on the washer, you can move them around and put them however you would like.  My sweet son wanted them to look like they were doing a cartwheel and this is how he lined them up!  Love that boy!


Well, that's my very long post for today.  I hope it gave you some ideas you'd like to try. 
Thanks for looking and have a wonderful and blessed day. 


Wednesday, February 1, 2012

Cardz TV Cricut Cardz Challenge 101

I've recently started following the Cardz TV blog and they have challenges using Cricut Cartridges. Challenge 101 is "Be My Valentine!" Make a card for Valentine's Day, using any cartridge(s) and using any colors you'd like.


My son is loving penguins lately and I know he wants a penguin on his Valentine card. So here is what I made him.


I used the Create-a-Critter cartridge for the train and the penguin.  The hearts and the sentiment are stamps from my Happy Owlentine's Day stamp set by The Craft's Meow.  I just double stamped the "Whoo" part to give it a train sound. : )   He's 5 and I thought he would really get a kick out of seeing his picture on the card. I should have picked a better one of his face but I was being lazy and already had this picture printed that I could cut out and use. The papers were all from my scraps pile. Yay me for using up some of those.  Using up those scraps is one of the great things about the Cricut. 

Thanks for looking.  I enjoy your comments, so don't forget to leave one! ; )

Friday, January 20, 2012

DCWV January Stack-a-holic Template Challenge

I'm really enjoying these DCWV Stack-a-holic template challenges. They sure do motivate me to get some scrapbook pages done.  You can check out the challenge details HERE.


Here's my take on it.
I used the Lemon Flower DCWV stack


 Check out all the texture in these papers! Love them!


 The monkey's are pop-dotted but it's hard to see in the picture.


I wrapped green floss around the branch cut to give it some personality.

Check out the contest over at DCWV's blog. You have until January 31st to enter.

The monkeys were cut from the Create-a-Critter Cricut Cartridge. 
The "Let's Hang Out" was also cut from Create-a-Critter. 
The branch was cut from Zoo Balloo Cricut Cartridge. I welded two of them together in the Cricut Craft Room. 
The Striped background was cut using the Elegant Edges Cricut Cartridge.

The Banana circle was done on my computer. As was the journaling.
 Thanks so much for looking. 


Wednesday, December 21, 2011

Snow much framed snowman


Here's a little framed snowman that I made for my Aunt as her Christmas present. 


I used DCWV paper for all of it except for the scarf. That was a scrap piece of paper and I'm not sure what brand it was.  I cut the background using the Elegant Edges cartridge.  I cut the snowman from the Christmas Cheer Cricut cartridge.   I cut the words using the Jasmine Cricut cartridge.  I used the "shadow" feature to make it a little thicker and I traced around the edges with black marker to make them stand out.   I drew in his eyes and mouth with black marker.  Added some bling buttons and bling flower on the hat and that was it. Super easy and super cute.

Thanks for taking the time to look. Blessings to you. 

Sunday, December 4, 2011

DCWV December Stack-a-holic Template Challenge

It's that time again!  DCWV has posted their December Template Challenge.  You can find all the details HERE.   Here's what the template looks like:


Here's my interpretation of it  :


I used the DCWV Doodlin' Around Stack for the background paper and the jounaling tag.  The Bronze colored paper that makes the circle design is DCWV from the Shimmer stack. The matt paper and the Wheeeee title were done with paper from the DCWV Brights stack. 

The bronze circle design was cut from the Elegant Edges Cricut cartridge using the "Design 1" frame. I cut it using fit to page.  The "Wheeee" title was cut using the Art Nouveau Cricut cartridge.  I welded it together in the Cricut Craft Room.  The Journaling Shape was cut from Elegant Edges using the oblong feature on "Circle 2."

The crocheted ribbon was from my garage sale stash.  My version of the stick pin is a toothpick that I colored with a metallic bronze marker and then added the "Fun" circle that is a cut out from the Doodlin Around Stack.   The white lettering is a gel pen. 

I liked this template so much that I made another layout using the "punched out parts" of the Design 1 frame that were left over from the first layout.

Here's how it turned out:


I used the Doodlin' Around stack for this layout too. 

Thanks so much for taking the time to look at my post. 
I appreciate all comments. Each one is a blessing. 

Wednesday, November 9, 2011

Moxie Fab 365 Card Week - Celebrating Relationships Challenge

I'm hooked on Moxie Fab's blog. So much great stuff on there.  Today I'm sharing a card that I made for the Moxie Fab 365 Cards Week - Celebrating Relationships Challenge.  You can check out the details HERE.

I chose to have my card be for Grandparents Day.


Inside of the card

Here's the details:   I used DCWV papers. I inked the edges with Martha Stewart Lilac ink. The gems are from Recollections. The "One in a Million" stamp is from Fiskars. The ribbon and lace are from my garage sale stash. The butterfly is cut from a Cricut cartridge but I can't remember which one. Sorry.   On the inside I added a computer generated message and I fussy cut one of the flowers from the DCWV paper.  I also rounded the top edges of the card with my Marvy corner punch.   I think that about covers it. 

Thanks so much for looking. : )  Comments are always a blessing.