Wednesday, December 21, 2011

Snow much framed snowman


Here's a little framed snowman that I made for my Aunt as her Christmas present. 


I used DCWV paper for all of it except for the scarf. That was a scrap piece of paper and I'm not sure what brand it was.  I cut the background using the Elegant Edges cartridge.  I cut the snowman from the Christmas Cheer Cricut cartridge.   I cut the words using the Jasmine Cricut cartridge.  I used the "shadow" feature to make it a little thicker and I traced around the edges with black marker to make them stand out.   I drew in his eyes and mouth with black marker.  Added some bling buttons and bling flower on the hat and that was it. Super easy and super cute.

Thanks for taking the time to look. Blessings to you. 

Sunday, December 18, 2011

Gift Card Holders

Robyn over at My Pink Stamper  is having a 12 days of Christmas event.  Her challenge today was to make a gift card holder.   Here are some that I made for my nieces and nephews. The gift card came as an 8 1/2 x 11 sheet so I needed to make something much larger than most gift card holders.  I also decided I didn't want the holder to have a Christmas look to it.  I thought maybe they could hang it on their bulletin board or use it on a desk or something.  Anyway... here's what my holders look like:


Thanks for looking.  Hope you have a blessed day. 

Friday, December 16, 2011

In Memory

In memory of my dear little brother

Jim Carlson
January 23, 1971 - December 14, 2011

I miss you so much already.


Christmas 197? 


Jim & Dad...two peas in a pod


Thanksgiving 2007


 Jim with his wife & 4 kids


You have given me so many many memories.  I love you more than words can say. 
Rest in peace my little brother.


Friday, December 9, 2011

Framed Verse

Just a quick post today.  I made this framed  verse for a family friend as her Christmas present.  I was able to get a great deal on the frames from Michael's.  I'm hoping to make different versions for different family and friends.

So here's the one for today:


This is it without the frame so you can see it without the glare.


Close up of some of the details


Here it is finished in the frame.


I'd like to also show you really quick one that I made for my mother-in-laws birthday a couple months ago.  I didn't get a picture of it in the frame but it was the same frame as above.   I cut the poodle from the Summer in Paris Cricut cartridge and the background shape from Elegant Edges.  It looked really sweet in the frame.


Thanks so much for taking the time to look.  May your day be blessed. 

Sunday, December 4, 2011

DCWV December Stack-a-holic Template Challenge

It's that time again!  DCWV has posted their December Template Challenge.  You can find all the details HERE.   Here's what the template looks like:


Here's my interpretation of it  :


I used the DCWV Doodlin' Around Stack for the background paper and the jounaling tag.  The Bronze colored paper that makes the circle design is DCWV from the Shimmer stack. The matt paper and the Wheeeee title were done with paper from the DCWV Brights stack. 

The bronze circle design was cut from the Elegant Edges Cricut cartridge using the "Design 1" frame. I cut it using fit to page.  The "Wheeee" title was cut using the Art Nouveau Cricut cartridge.  I welded it together in the Cricut Craft Room.  The Journaling Shape was cut from Elegant Edges using the oblong feature on "Circle 2."

The crocheted ribbon was from my garage sale stash.  My version of the stick pin is a toothpick that I colored with a metallic bronze marker and then added the "Fun" circle that is a cut out from the Doodlin Around Stack.   The white lettering is a gel pen. 

I liked this template so much that I made another layout using the "punched out parts" of the Design 1 frame that were left over from the first layout.

Here's how it turned out:


I used the Doodlin' Around stack for this layout too. 

Thanks so much for taking the time to look at my post. 
I appreciate all comments. Each one is a blessing. 

Saturday, December 3, 2011

Party Time Birthday Card

Today I'd like to share a sparkly birthday card that I made for a relative. 


I had a hard time capturing all the sparkle. 

I used DCWV glitter stack paper. I used Diamond Stickles around the silver circle. The ribbon is from my garage sale stash. The stickers I am sad to say I don't know who made them. I had cut up the packaging to make it fit where I wanted to store it and didn't save the company info. I wasn't blogging then so I didn't think about needing that.  I'll do better in the future.  : ) 

Thanks for taking the time to look.  Would love to hear your comments.  Each one is a blessing. 

Saturday, November 19, 2011

Thank you treat containers and cards

I made cards and treat containers for all the office staff and my son's teacher at his school. I just wanted to tell them thank you for all they do to bless us and Aidan's education.

I'll apologize in advance...my pictures aren't the greatest.  The lighting in my craft area is really horrible and my camera isn't focusing all that well. ( could be because I dropped it a few months back...hasn't been the same since!)

So, here's what I made.


These are the cards


Close up of a few of the cards


Here's the treat containers


I'm so happy with my ribbon flower. This was my first time making my own. 
Silly I know, since it's not that hard.  Yet, I'm still excited about it.  : ) 


Side view...  I only put ribbons on a few. 


A little different view... I liked the look of it. ; )

Thanks for taking the time to look.  Leave me a comment.  Each one is a blessing!


In case I don't get another post in .... Happy Thanksgiving to you all.


Saturday, November 12, 2011

Pinkalicious Blog Hop Challenge

Today's post is a scrapbook page I made for the Pinkalicious Blog Hop Challenge.  The hop was so much fun & I just had to participate in the challenge.  Robyn wanted us to make a scrapbook page or mini book using our Cricut and her My Pink Stamper sets (if we have them.) I sadly do not own any of her fabulous stamps....YET! You should check out her site on the link above. You won't be disappointed.

So here's my layout using my Cricut and some stamps:

 My Dad came for Grandparent's Day at Aidan's school


 All the cardstock is from DCWV. The only thing that isn't is the striped paper. Sorry I don't know who makes that.  A friend had given me a ton of papers she wasn't using and that's one of them.


 All the blue words are lifted up with foam & are stamps from Fiskars.  The ink is Color Box Blue Iris.
The tan heart was cut from the Spring Fever Cricut cartridge and lifted up with foam squares.

 The "Grandparents" ribbon is so fabulous but I don't know who made it. Sorry. 


Both layers of the frame and the journaling tag were cut using Elegant Edges from Cricut. 
The little tags under the words were cut using punches from Stampin' Up. 

The bling is from Hero Arts. My journaling is computer generated. 


Thanks so much for looking.  Every comment is a blessing to me. 

Wednesday, November 9, 2011

Moxie Fab 365 Card Week - Celebrating Relationships Challenge

I'm hooked on Moxie Fab's blog. So much great stuff on there.  Today I'm sharing a card that I made for the Moxie Fab 365 Cards Week - Celebrating Relationships Challenge.  You can check out the details HERE.

I chose to have my card be for Grandparents Day.


Inside of the card

Here's the details:   I used DCWV papers. I inked the edges with Martha Stewart Lilac ink. The gems are from Recollections. The "One in a Million" stamp is from Fiskars. The ribbon and lace are from my garage sale stash. The butterfly is cut from a Cricut cartridge but I can't remember which one. Sorry.   On the inside I added a computer generated message and I fussy cut one of the flowers from the DCWV paper.  I also rounded the top edges of the card with my Marvy corner punch.   I think that about covers it. 

Thanks so much for looking. : )  Comments are always a blessing. 

Sunday, November 6, 2011

DCWV November Stack-a-holic Template Challenge

I really loved having that extra hour due to Daylight Savings Time!  I was able to knock out 90% of my layout for the DCWV November Stack-a-holic Template Challenge.  You can see the details for the challenge HERE.

This is the template


This is my take on it


Close up of the right side

Close up of the left side

Close up of the bird... he's so cute!

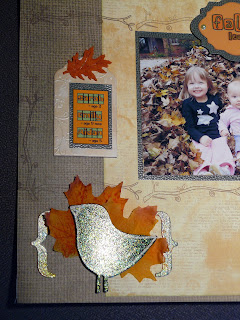
So here's the details: I used the Textures & Finishes Stack by DCWV for my papers. (There's 3 different patterns from this stack represented.)  I used a Hero Arts bare branch stamp from their Fanciful Swirl Alphabet set to make my border. The felt leaves are from Hero Arts.  The other two fabric leaves under the bird are from Michaels.   The awesome glitter bird and parentheses are from The Colorful Life chipboard collection by DCWV.   The chipboard tag is from Heidi Grace Designs.  It was white and I inked it with Tim Holtz Distress Ink -vintage photo- and then wiped it off to achieve the softer color.  I let it dry overnight.  I tried writing my kids names but that didn't turn out well at all.  My handwriting is awful! So to cover it up and not lose the tag, I made a computer generated tag with their names and ages.   The "Fall Leaves" sentiment is a sticker from Reminisce and sits on a two layers of frames that I cut out using the shadow function from the Elegant Edges Cricut cartridge.  I inked the edges with my Color Box Dark Brown ink.   I think that covers everything. 

Thanks so much for looking. May your day be blessed.  : ) 


Thursday, November 3, 2011

Button Tree Card

I am a follower of Hero Arts and they recently posted a video on how to make a button tree.  You can see the post HERE.  I was really inspired to use up some of my massive button stash (thanks Mom!) and this is the card I came up with.


I didn't do it exactly as Shari Carrol of Hero Arts did. (Although I have my clear buttons set aside and will try it when I get a chance.) I used white/cream buttons on a patterned background and streaked them with glitter glue.  The papers I used are from DCWV.  I cut the tree using the Christmas Cheer Cricut Cartridge. One in the patterned paper and then one I offset in the red. I popped up the tree with foam dots.  The stamp is from Stampin Up. The white paper is actually glitter paper but it doesn't look like it's showing up all that well in the pictures.   I really had fun making this card and have plans for at least two more like it.  

While I was working on mine, my 3 year old daughter said she wanted to play with buttons.  So I gave her a bunch of buttons and used my ATG gun to put down a Christmas tree shape with glue that she then stuck her buttons on.  When she was finished, we added glitter to cover up the left over glue.  She then stamped the Merry Christmas stamp on the cards. (It's from Stampin Up)  I inked the edges of the cards.   She even made one to look like a wreath.


I hope you enjoyed today's post. Thanks so much for looking.  : ) 

Tuesday, November 1, 2011

Hero Arts November Contest

Ok, so today Hero Arts started their November Contest.  You can check out the details HERE.  One of the options is to make a card with bling.  I LOVE BLING!  So I was very excited to see what I could come up with.  I had it in my head that I needed to make a card for a relative that lives far away to send her for Thanksgiving. This is what I came up with.


It's so hard to capture all the sparkle in pictures, isn't it?  


I haven't decided on the inside sentiment yet.  I'm thinking either "we're part of the same family tree." or something simple like "for you." 

Here's the details. I used DCWV papers. The striped background paper is from the "Green Stack."  It doesn't come with the glitter on it.  I wanted to make this card with extra bling, so I used my atg gun to run glue lines along the card and then covered them in glitter ( Barbara Trombley's Original Art Glittering System, Ultra Fine Nirvana Transparent...to be exact.)  I cut the tree from the Cricut Alphabet cartridge that came with my Expression 2. I added lots of Hero Arts bling with the blue gemstones and used the Hero Arts Fanciful Swirl Alphabet stamps to make my sentiment.

Thanks so much for looking. I'd love to hear your comments.