Monday, April 30, 2012

Personalized baby gift

Today I'd like to share with you a shadow frame & a card that I made for a friend of mine who just had a baby.  As you can see from the picture below, the baby came a little early and is a tiny peanut at 3lb 14 oz but she's doing well in the NICU and we are thankful. 


(I had to "blur" out her last name since I don't have permission from her Mama to post that in blogland)


Here's some details:

The card I made using the New Arrival Cricut cartridge. 
The congratulations stamp is from Fiskars.
The papers I used are all The Paper Studio.

The frame is a shadow frame I bought from Michael's. 
For the inside, I used the Cricut Craft Room and laid out the design.
I used the Jasmine Cartridge, Art Nouveau, Beyond Birthdays, Disney Pooh Font Set & New Arrival.

Instead of cutting out all the cuts, I used the Cricut Ink and had it "draw" them on the white cardstock.
Then I colored them in with colored pencils.
I added some flowers and gems and Stickles for the extra touches. 

On the outside of the frame I added some ribbon. To adhere it I used Terrifically Tacky Tape and it stuck on there really well. : )   A few paper flowers and some gems on the outside to finish it off. 

I'm also going to make her some "devotional diapers" that I saw on The Better Mom website and then get this package in the mail. 

Thanks for spending a few minutes with me. 
Hope you'll come back again soon.
: )  

Thursday, April 26, 2012

Fairy Dust Birthday

I'd like to share with you a birthday card I made using some digi-stamps from Bugaboo Stamps.
I wanted to participate in their Stella Says Sketch Challenge 109.
I'm getting used to these digi's and am really starting to have some fun with them. 
If you haven't tried them, I highly recommend it. 


Here's the sketch:


So here's my card:


I used the digi image of Girl Fairy Birthday Dust from Bugaboo.
It comes with the sentiment. "Birthdays are regular days sprinkled with fairy dust"
I colored her using colored pencils.  
I added Stickles to her petal skirt. And on the circle of the sentiment.
You can't see it in these pictures but I added Glossy Accents to her wings.
I really like the effect of the Glossy Accents.
The glitter paper for the mat is from DCWV.
The calendar paper is from Foof-a-la's Hall Pass collection.
I trimmed the paper with the Fiskars grass punch and added some ink and stickles.
The pink ribbon is from my stash.
I added some gems and doodled around the edges.
That about covers it. 
Hope you found something to take away from this card.
Pop on over to Catch the Bug Challenge Blog if you'd like to participate in any of their challenges.

Thanks for stopping by. 


Wednesday, April 25, 2012

Enjoy the ride - layout

My layout I want to share with you today is another one for my parents 50th wedding anniversary scrapbook.   I'll be honest and say that this layout was a little out of my comfort zone for a couple of reasons.  One, I'm always intimidated by paper with big prints or  words on it because I have a hard time covering them up.  Two, I have a hard time not using a lot of pictures or using big pictures.  So I struggled a little with this but I'm happy with how it turned out. It's good to get out of your comfort zone sometimes, right? : )

(you can click on the pic to make it larger)


Here's a few close ups:

The bicycle was cut using the Summer in Paris Cricut Cartridge.
I cut two of them and offset to give some shadow and color.
I did a little journaling on the bike with a white gel pen.
I also added a gem from Webster's Pages.

The plane I cut from the packaging of my Webster's Pages papers.
The clouds I stamped on some Webster's Pages paper using Sweet Stamp Shop stamp.
Another Webster's Pages gem in the corner.

Enjoy the Ride was cut using the Graphically Speaking Cricut cartridge.
A few more Webster's pages gems. 

A few more details:
The bottom border is actually the part you are to cut off the 12x12 page because it's the "packaging-title" or whatever you want to call it.  
I also added two sets of "4 black gems" to the middle sides.  I felt it needed a little more black to tie everything together. 

I'm entering this in the Fantabulous Cricut Challenge, Challenge Me Monday # 108.
You need to make a project with a car, bike, plane , train, etc. 


Thanks for spending some time with me today. 
God Bless.


Tuesday, April 24, 2012

Anniversary Card

Today is my wedding anniversary.  : )   Mike & I have been married for 8 years.  We are wonderfully blessed. 

I'll be sharing the card that I made for him.  It was inspired by a picture I saw on the Moxie Fab World blog.

This is the picture that inspired me: 


This is the card I made:


I used the colors of pink & green because those were our wedding colors. 

The birds I cut at 3 inches using Create-a-Critter Cricut Cartridge.
The heart and the top hat are also from that cartridge. 
I used several different paper lines, Best Occasions, Paper Studio and K&Company.
The gray background paper was embossed with the Cuttlebug "Wicker Weave" embossing folder. 
I added some stitching lines to mimic the inspiration picture. 
The You & Me is a stamp from Studio G. 


My husband, a man of few words, did tell me that the card looked like one you would buy at the store.
I think that means he likes it. ; )


Thanks for stopping by today. 
Have a wonderful week. 

God bless. 


Saturday, April 21, 2012

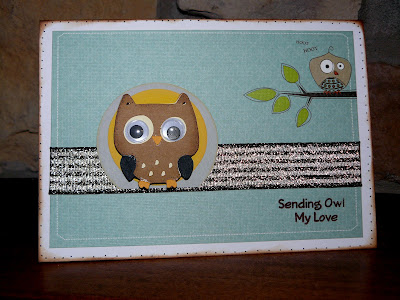
Owl my love birthday

Thanks for stopping by. I'm so glad you are here.
 My project today is a card that I made for an upcoming birthday. 

(you can click on the picture to see it larger)

I used a premade white card base.
The patterned paper is a 4x6 matt from the DCWV "Green Stack."
It already has the funny little owl up in the corner.
I added some Craft Smart brown and gold ribbon.
The gray and yellow "moon" layers were scraps already in those shapes.
The owl was cut at 2inches from the Cricut Create a Critter Cartridge.
I added some googly eyes to him. 
The stamped sentiment is from The Craft's Meow "Happy Owlentine's Day" stamp set.
I added some dots around the edge of the card and the owl (hard to see.)
I inked all the edges with Color Box ink in Chestnut.

That about covers it.

Thanks for taking a look. 
Have a wonderful day.


Saturday, April 14, 2012

Hey there, Sunshine

Here's a another card I made using the sketch from the DCWV April Sketch Challenge.  You can check out the challenge Here.  There's still plenty of time to play along.   This time I used the Lemon Flower Stack.


So all the papers are the Lemon Flower Stack. 
I cut the circle & the long banner shape from Elegant Edges.
The sunshine is from Graphically Speaking (if I remember right.)
The stamp is from My Creative Time set called This & That.
I inked all the edges and pop dotted the banner layer and
tied a little silver thread to match the silver in the cardstock.

That's all for this post. : )
Have a wonderful weekend.


Check out Pink & Paper

Looking for action wobbles or twine????  Check out Pink & Paper's blog.  She just opened a store and you won't be disappointed in her prices (or her... she's a sweet as can be.)  Don't miss out! : )


Friday, April 13, 2012

Level Up Birthday Card

I have a nephew that will be hitting double digits in May.  I made the following card for him using the sketch from the DCWV April Sketch Challenge.  This is the first time DCWV is having a card sketch challenge. Of course I couldn't resist it and have to play along. : )


I used the Generation Tech DCWV stack for my patterned paper.
The "Level Up" is a tag you can cut out from this stack.
The solid papers are from the Citrus DCWV stack.
I cut the "speech bubble" from the Graphically Speaking Cricut Cartridge.
The ribbon is from my stash.
The "Play" is a shrinky sticker from a company called Around the Block
I inked all the edges using Studio G inks. 

Thanks for stopping by.  I'd love it if you'd take a moment to leave me a comment.
If you're inspired, I'd really love for you to become a follower. : D


Monday, April 9, 2012

Stella Says Sketch Challenge 108

I decided to try the challenge over on the Catch The Bug Challenge Blog.  It's the Stella Says Sketch Challenge 108.  Here's my version of the sketch:


I used the Pig-Cupcakes image from Bugaboo Stamps (You can find it here)
I colored the sweet little piggy using colored pencils. 
The patterned paper is from DCWV "Sweet" Matstack.
I added a strip of turquoise cardstock, a pink button tied with some silver thread.
And wrapped the other end of the strip with the silver thread. 
Matted everything on brown cardstock and ta-da! 

Short and sweet!  : D

Thanks for taking a look.  Hope you enjoyed your time here.
Come back soon.


(I've turned off word verification...if you're finding it on here, please let me know. Thanks.)

Saturday, April 7, 2012

Party Thank You Treat Bags

Tomorrow while we are with my husband's side of the family for Easter, we will be celebrating my son's 6th birthday. (Even though he doesn't turn 6 until the 22nd.)  So on top of making Easter baskets for the kids, I made little thank you bags too. Here's how they turned out:


(you can click on the pictures to see them larger)


I needed to make for 2 girls and 3 boys.

I decorated these cute little canvas bags with Cricut Cuts (except for the bunny - That's a Bugaboo Digi Stamp.)  I also used Sweet Stamp Shop stamps for the sentiments and names.

Just for fun I made some funny face Straw Toppers using a cut from Graphically Speaking.
I added Googly Eyes to make them more fun.
On the back of the straw toppers I added magnets. That way they can remove the straw topper and put it on the fridge to use the next time. : )  (That's of course if the topper doesn't get destroyed on their first time using it.)

I also made a few popsicle stick characters for the youngest 4 to play with. 
These were done quickly and not with a lot of detail.
They were cut using the Best Images of 2009 cartridge.
I used the Cricut Craft Room to make them, flip the image for the back side and to hide the eye cut out on the back image. I also used the Cricut Ink pen to trace them first before I cut them. 

So along with the straw toppers, some extra straws and the stick figures, I added some candy and a snack pack.

Thanks for taking a look. Hope you got some inspiration. Let me know if you have any questions.

God Bless.


Wednesday, April 4, 2012

Love Birds - 1962

Today's post is a layout for my parent's 50th anniversary scrapbook. I won the In Love Collection from Webster's Pages.  It is such a gorgeous collection and I'm actually having a hard time using it because I want to hoard it!  Shame on me. I know.   If you check out their website you can see all the incredible products they have and tons of beautiful sample pages on how to use them.   I really love the layered, heavily embellished pages that they showcase but I'm not so good at making those kinds of pages.  I guess I'm more of a clean and simple gal!  (probably because I'm hoarding the supplies!!!)  So anyway, on to my layout:


(you can click on the pictures to see them larger)


a little closer view of some of the embellishements


I love all the beautiful embellishments that Webster's Pages provides. 
The cameo, the resin heart, the rhinestone button, the heart ribbon trim, & the Love Birds journaling card are all part of the In Love Collection.
I cut out the words "Cherish" & "Forever" from the patterned paper.
I also fussy cut the flower part from the paper and used foam tape to give it some dimension.
The butterflies are stamps that I stamped and cut out. I added some Stickles to them and a pearl dot.


 Here's another layout I've made using Webster's Pages In Love Collection.

I cut the bird cage out of the In Love papers using the Best Images of 2009 Cricut Cartridge. 
The other layered border shapes were cut using Elegant Edges Cricut Cartridge.
I used the beautiful fabric tag, princess petal, & flower cameo embellishements.
The word "family" is alpha stickers from the In Love Collection too.

Not hard to make a pretty layout with their incredible products. : )

Thanks for taking a look. 
Have a blessed day. 


Tuesday, April 3, 2012

DCWV April Stack-a-holic Challenge

You're probably going to be seeing lots of layouts from me in the upcoming weeks.  I'm working on an album to celebrate my parents 50th wedding anniversary.  So lots of pages to get done. : )

Today's layout is one I made using the template for the DCWV April Stack-a-holics template challenge.

Here's my layout:

 (you should be able to click on the picture to see it bigger.)


Here's the template:


I used the DCWV Mainstreet Stack for my papers. 
I cut my "reminisce" title from one of the word pages in this stack.
I also cut out the little picture frame from another page. 
I did my journaling on my computer.
The flowers were cut from my new Spellbinders Layered Flowers dies that I won from Nina B.
Thanks Nina! 
I added some buttons that I glue dotted two together and then put a pearl on top.
A couple of blue butterflies and some more pearls and I'm done. 

Thanks for taking a look.  I'd love to hear your thoughts and comments.
(I turned off word verification ... (I hope!)  if you find that it's still on, please let me know so I can fix it. Thanks!))


Monday, April 2, 2012

Monster Truck

Hello crafty friends.  My post for today is a birthday card I made for my son.  He'll turn 6 on the 22nd of this month. He's a big fan of Monster Trucks.


I used the sketch from Stella Says Sketch Challenge #107 over on the Catch the Bug Challenge Blog.

The Monster Truck is a digi image from Bugaboo Digi Stamps and you can get it here.
I colored mine with colored pencils. 
The patterened paper is Echo Park.
I trimmed the green cardstock with my Fiskars grass punch.
My son's name is done with Webster's Pages sticker alphabet.  The color of the letters is actually tan but I went over them with the same colored pencil I used for the truck and I'm pleased with how it turned out.
I added 3 gray pearl dots and that completed the sketch. 

Thanks for taking a look.  I look forward to hearing your comments.
Have a wonderful week.