Friday, December 7, 2012

Christmas Gift Card Holder

This year I have a LOT of gift cards to give to the people I'm shopping for.  It makes me a little sad that my nieces and nephews have grown up so much that they want gift cards instead of presents. Oh well.... I saw a blog post by Paul - which you can see HERE.  He made a treat holder.  I really liked the look of it and wanted to try it but I made mine to hold a gift card instead of a treat.  He has easy step by step instructions on an older post that you can see over here.   If I can follow them, then anyone can follow them!  LOL.

So here's what my first attempt looks like:


The only alteration I made to his instructions was instead of an oval punch,  I just cut a slit using my paper trimmer. So that way I could put in a gift card instead of a treat.

I plan to add something on the inside to sign our names and wish him a Merry Christmas but other than that this project is done. It was really easy and I plan to make at least a few more of them. 


Pattern Paper is My Minds Eye Holiday Glitter Book
The Snowflake is from Tags, Bags Boxes & More 2 cartridge, page 47
The gem in the center of the snowflake is from Recollections
I used Stickles Glitter Glue
I inked all the edges with Color Box ink. 

Thanks so much for taking a look. 
Hope your Christmas season is off to a wonderful start. 

God bless.

Chris


Monday, December 3, 2012

Get Well Wishes Card

Thanks to all who sent me encouragement and love regarding my last post about my sister's breast cancer diagnosis.  A little update on her; the surgery is done.  She's recovering from it pretty well. Lots of pain but she's back to work (she's a teacher.)  The best news of all is that she doesn't have to do any chemo.  They believe that they got it early enough and removed what was there... so we are celebrating this extra special blessing.

Now on to the card.  I finally got brave and used some of the black card bases and envelopes that I have had for quite some time.  I don't know why I was intimidated by them but I was.  


 This picture is of the inside and of the envelope. I really love how this turned out. It's up there toward the top of my all time favorites.

The beautiful patterned papers and the bicycle tag and inside flower are all from Webster's Pages.  I LOVE their products.  So, so pretty and great quality. 

The "get well wishes" stamp is from My Creative Time's Pain Pain Go Away set.
The "feel better soon" stamp is from Sweet Stamp Shop's set called Scootin By.
The flower stamp on the envelope is a 2007 Stampin' Up stamp.

I'll throw in a few bonus cards today... no deets...just pictures.
These are some cards I've made lately and haven't had time to share.
If you want details, just drop me a comment and I'll get back to you. :)


This little guy is on an action wobble! Love those. They are so fun!
(if you want a good deal on action wobbles, check out Pink & Paper's store)


Thanks for taking a look.

Hope you're "keeping calm and crafting on."  .... 
lol... I keep seeing those quotes like that and they are stuck in my head. 

God bless.

-Chris


Tuesday, October 30, 2012

Pink Ribbon Gift Bags

I know it's been forever since I've done a post.  Life has been just way too busy.  So this post will just be a quick one.   My sister has been diagnosed with breast cancer and she's having surgery on Nov. 1st.   I made up some pink ribbon gift bags that she can give to the nurses and staff that are taking care of her as a thank you.

Here's what they look like:


I finally figured out how to (sort of) use my Tags Bags Boxes & More 2 cartridge.   That's what I used to cut the bags.  I used a 2 1/2 inch marvy scallop punch for the tags. The thank you stamp is from Fiskars I believe and the You Rock and music note stamps are from Lawn Fawn.   I made the ribbons using some pink tulle and a brad.  The bags are filled with yummy treats.   I think they'll be a hit with the nurses.

Hope you all are having a blessed day.

Thanks for taking a look.

Big hugs.
Chris


Tuesday, July 31, 2012

Anniversary Card

I've just returned from spending a week at my parents house and spending time with my family.  So now that I'm back, it's time to get back into a routine. (especially since school will be starting in two weeks... yikes!)  Today, I'm sharing a card I made for my sister's wedding anniversary.


The patterened papers are from Webster's Pages.  I have a ton of 6x6 papers from them. So I cut them and layered them to make this 5x7 card. 
The ribbon is from Webster's Pages also.
The "Celebrate" stamp is from the Dollar Bin at Michael's. 
The "Happy Anniversary" stamp is from Hero Arts. 

Thanks for stopping by.  Hope you're having a fabulously crafty week.

-Chris


Thursday, July 19, 2012

Grow Grow Grow

Here's another layout for my sister's album. This time I did use DCWV papers and the DCWV July Stack-a-holic Challenge layout.  So now I can enter in the challenge.


My papers are from the DCWV Lemon Flower Stack.
I cut the words using the Cricut Craft Room Basics letters that I welded together.
The glittered flower is part of one of the patterned papers in the stack. I just fussy cut it out.
I added some pearl flourishes and called it a day. : )

I've been bad about getting posts up on the blog.  I've been so busy with this album.  I've made 24 pages so far and have hardly shown anything here.   Having 3 little kids keeps me busy and time gets away from me.   I'll try to get some more posted soon. 

Hope you have a blessed day.

-Chris


Monday, July 9, 2012

What do you remember?

So to continue with my sister's 50th birthday scrapbook, today's layout is one I did using the July DCWV Stack-a-holic Challenge sketch. (I can't use this as an entry because I didn't use DCWV papers - need to do another layout to enter but wanted to share this layout with you all.)

Here's my layout:

I used the Habitat Collection (Recollections) for my papers. 
The butterfly and little flower are from DCWV Street Lace Chipboard set.
The year numbers are from Cloud 9 Designs.

I did something a little different with this page.
As you can see at the top of the page is a question, "What do you remember of 1983?"
If you pull that tab up, you get a card  to write down memories of the year as shown below.


Since I am making this album for my sister and have limited pictures and memories, I thought it would be great if she could jot down a few memories after she receives the book to make it more complete.


This is a picture of the pocket I made on the back of the page to hold the card.


I'm hoping she thinks this is a good idea. LOL. If not, I can easily remove the card and it doesn't take anything away from the page itself. 

Hope you are all off to a wonderful crafting start to your week.

God Bless.

-Chris


Saturday, June 23, 2012

Another Layout for my sister

Here's another layout for my sister's scrapbook. This will actually be the first page in the book. (I rarely do anything in order... lol.)   I used all Webster's Pages In Love Collection again.  Only the pearls and gems are from my stash. The rest is all Webster's Pages.

(I didn't think I should share her personal info, so it's blurred out)

I made this flower using an IN LOVE princess petal that I surrounded with some of the ruffled lace.
The stem is made using the soft velvet ribbon from this collection.
I added the pearl flourish and flower center from my stash. 


(This is a close up of the ribbon layered on this picture. I used the ruffled lace, added the velvet on top  and then some pearls to complete it. )

Hope you found something to inspire you.
Have a blessed day.

Chris


Thursday, June 21, 2012

Started the album for my sis

Okay, I'm starting to get back into the swing of things. : )   I've started the album for my sister's 50th birthday present. Woohoo! Now I need to really buckle down and keep working on it.  

So for this layout I used  Webster's Pages products. Mostly from the IN LOVE COLLECTION.


I just love these pictures of her. What a cutie!

I trimmed the butterflies from one of the 12x12 pages I had. The Chevron paper was from a 6x6 piece. 
I cut two different pattern papers in a scallop circle shape using my Marvy Punches one at 2 1/2 inches and one at 3 inches. I added the "adore" fabric ticket to the top of it and put it all on the page with foam squares. The ribbon I used from the In Love collection is so awesome to touch because it's like velvet. SOOOOO  soft!  I just love it!  
The journaling card is from this collection also. 
The sticker letters I used to spell out her name are from the collection too. The only thing I didn't like is that all the letters are lowercase.  So I improvised and added an a "p" to the top of the lower case "r" to make it look like a capital "R." 

A few pearl dots from my stash and I'm done.

Thanks for taking a look.  Hope you're having a wonderfully creative week!

: ) Chris

Sunday, June 17, 2012

Treat Tins

I know it's been forever since I posted. So sorry for being out of the loop for so long.  I think I got burned out from working on my parent's 50th anniversary stuff.  I'm thrilled with how all their stuff turned out but I'm kicking myself because I didn't take pictures of everything!  *GASP* I know! What was I thinking??? That's the problem, I wasn't. LOL.   So my Mom has promised me to bring the 3 albums that I made for them with her to my house next week and I'll be able to take pictures and share with you what I spent all my crafty time on. : )  I did remember to take pictures of the treat tins we had sitting at every place setting.  My sister-in-law and I worked on these together.   I got the idea from the DCWV blog.

Here's some pics:


All the flowers on the top are magnets.  We added different centers to each of the paper flowers and inked all the edges then added magnets.   We cut out the shaped tops from Elegant Edges, inked them and stamped them with a few different sayings. Then we modge-podged them to the tin. (Ok, my sister-in-law did and she still loves me even after all that!)


Here's the insides:


We had mints in the bottom. The inside top of the tin was also 3 magnets that we made.
The round ones are wood circles that we glued different papers to the top of and stamped different images on. We inked the edges of the wood circles and it looked so cool! Sorry I didn't get a good picture of it.  The other shaped magnets were shapes I cut out using the Cricut. We inked, doodled on and added magnets to finish those off.   We made a total of 72 tins.  So that was a LOT of magnets. 

(This is my 3 year old helping me fill the tins)


This is the tin I made to hold the cards they received at the party.
Sorry for the bad picture. This was with my cell phone to show my sister what it was looking like.
It's not the finished product but it's really close.   This was an old cookie tin that I decorated with cuts from my Cricut Cartridges. Sorry I can't remember which cartridges I used.  The only one I know for sure is Elegant Edges for the scalloped ovals. 


I'll post more pictures of my parent's scrapbook albums once I get them.
In the mean time, my next big project is for my sister. She's turning 50 in August and I'm making her an album.  I'll try and be better about taking pictures to share. : )


Thanks for sticking with me.  I hope to be back to a regular schedule again.

Big hugs!
Chris


Monday, April 30, 2012

Personalized baby gift

Today I'd like to share with you a shadow frame & a card that I made for a friend of mine who just had a baby.  As you can see from the picture below, the baby came a little early and is a tiny peanut at 3lb 14 oz but she's doing well in the NICU and we are thankful. 


(I had to "blur" out her last name since I don't have permission from her Mama to post that in blogland)


Here's some details:

The card I made using the New Arrival Cricut cartridge. 
The congratulations stamp is from Fiskars.
The papers I used are all The Paper Studio.

The frame is a shadow frame I bought from Michael's. 
For the inside, I used the Cricut Craft Room and laid out the design.
I used the Jasmine Cartridge, Art Nouveau, Beyond Birthdays, Disney Pooh Font Set & New Arrival.

Instead of cutting out all the cuts, I used the Cricut Ink and had it "draw" them on the white cardstock.
Then I colored them in with colored pencils.
I added some flowers and gems and Stickles for the extra touches. 

On the outside of the frame I added some ribbon. To adhere it I used Terrifically Tacky Tape and it stuck on there really well. : )   A few paper flowers and some gems on the outside to finish it off. 

I'm also going to make her some "devotional diapers" that I saw on The Better Mom website and then get this package in the mail. 

Thanks for spending a few minutes with me. 
Hope you'll come back again soon.
: )  

Thursday, April 26, 2012

Fairy Dust Birthday

I'd like to share with you a birthday card I made using some digi-stamps from Bugaboo Stamps.
I wanted to participate in their Stella Says Sketch Challenge 109.
I'm getting used to these digi's and am really starting to have some fun with them. 
If you haven't tried them, I highly recommend it. 


Here's the sketch:


So here's my card:


I used the digi image of Girl Fairy Birthday Dust from Bugaboo.
It comes with the sentiment. "Birthdays are regular days sprinkled with fairy dust"
I colored her using colored pencils.  
I added Stickles to her petal skirt. And on the circle of the sentiment.
You can't see it in these pictures but I added Glossy Accents to her wings.
I really like the effect of the Glossy Accents.
The glitter paper for the mat is from DCWV.
The calendar paper is from Foof-a-la's Hall Pass collection.
I trimmed the paper with the Fiskars grass punch and added some ink and stickles.
The pink ribbon is from my stash.
I added some gems and doodled around the edges.
That about covers it. 
Hope you found something to take away from this card.
Pop on over to Catch the Bug Challenge Blog if you'd like to participate in any of their challenges.

Thanks for stopping by. 


Wednesday, April 25, 2012

Enjoy the ride - layout

My layout I want to share with you today is another one for my parents 50th wedding anniversary scrapbook.   I'll be honest and say that this layout was a little out of my comfort zone for a couple of reasons.  One, I'm always intimidated by paper with big prints or  words on it because I have a hard time covering them up.  Two, I have a hard time not using a lot of pictures or using big pictures.  So I struggled a little with this but I'm happy with how it turned out. It's good to get out of your comfort zone sometimes, right? : )

(you can click on the pic to make it larger)


Here's a few close ups:

The bicycle was cut using the Summer in Paris Cricut Cartridge.
I cut two of them and offset to give some shadow and color.
I did a little journaling on the bike with a white gel pen.
I also added a gem from Webster's Pages.

The plane I cut from the packaging of my Webster's Pages papers.
The clouds I stamped on some Webster's Pages paper using Sweet Stamp Shop stamp.
Another Webster's Pages gem in the corner.

Enjoy the Ride was cut using the Graphically Speaking Cricut cartridge.
A few more Webster's pages gems. 

A few more details:
The bottom border is actually the part you are to cut off the 12x12 page because it's the "packaging-title" or whatever you want to call it.  
I also added two sets of "4 black gems" to the middle sides.  I felt it needed a little more black to tie everything together. 

I'm entering this in the Fantabulous Cricut Challenge, Challenge Me Monday # 108.
You need to make a project with a car, bike, plane , train, etc. 


Thanks for spending some time with me today. 
God Bless.


Tuesday, April 24, 2012

Anniversary Card

Today is my wedding anniversary.  : )   Mike & I have been married for 8 years.  We are wonderfully blessed. 

I'll be sharing the card that I made for him.  It was inspired by a picture I saw on the Moxie Fab World blog.

This is the picture that inspired me: 


This is the card I made:


I used the colors of pink & green because those were our wedding colors. 

The birds I cut at 3 inches using Create-a-Critter Cricut Cartridge.
The heart and the top hat are also from that cartridge. 
I used several different paper lines, Best Occasions, Paper Studio and K&Company.
The gray background paper was embossed with the Cuttlebug "Wicker Weave" embossing folder. 
I added some stitching lines to mimic the inspiration picture. 
The You & Me is a stamp from Studio G. 


My husband, a man of few words, did tell me that the card looked like one you would buy at the store.
I think that means he likes it. ; )


Thanks for stopping by today. 
Have a wonderful week. 

God bless. 


Saturday, April 21, 2012

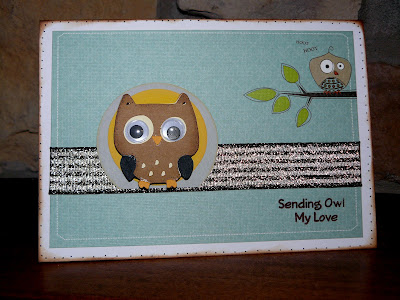
Owl my love birthday

Thanks for stopping by. I'm so glad you are here.
 My project today is a card that I made for an upcoming birthday. 

(you can click on the picture to see it larger)

I used a premade white card base.
The patterned paper is a 4x6 matt from the DCWV "Green Stack."
It already has the funny little owl up in the corner.
I added some Craft Smart brown and gold ribbon.
The gray and yellow "moon" layers were scraps already in those shapes.
The owl was cut at 2inches from the Cricut Create a Critter Cartridge.
I added some googly eyes to him. 
The stamped sentiment is from The Craft's Meow "Happy Owlentine's Day" stamp set.
I added some dots around the edge of the card and the owl (hard to see.)
I inked all the edges with Color Box ink in Chestnut.

That about covers it.

Thanks for taking a look. 
Have a wonderful day.


Saturday, April 14, 2012

Hey there, Sunshine

Here's a another card I made using the sketch from the DCWV April Sketch Challenge.  You can check out the challenge Here.  There's still plenty of time to play along.   This time I used the Lemon Flower Stack.


So all the papers are the Lemon Flower Stack. 
I cut the circle & the long banner shape from Elegant Edges.
The sunshine is from Graphically Speaking (if I remember right.)
The stamp is from My Creative Time set called This & That.
I inked all the edges and pop dotted the banner layer and
tied a little silver thread to match the silver in the cardstock.

That's all for this post. : )
Have a wonderful weekend.